
Complete and accurate measurements make all the difference
If you’ve installed cable railing for level runs, you’re familiar with setting and installing posts and running the cable through for a completed project. When it comes to stairs, it takes more planning to make sure you have the right measurements and materials.
We’ve compiled tips to consider from some of the most common mistakes we typically see when orders come through to our team of experts. If you have a tried-and-true tip you’ve discovered while installing RailFX on stairs, we’d like to hear about it. Contact us at marketing@railfx.net.
Tip: Include stairs in your project drawings
Example of incomplete stair measurement details.
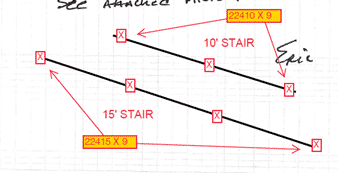
We often find the stair details are missing from drawings, and simple mistakes happen. We’ve detailed some top tips to set and install stair posts for the cable to have the proper tension.
It is important to note on the stairway runs; no two are alike. Once we receive an order at RailFX, more often than not, we may ask for additional information — pictures and measurements — when stairs are involved. In some cases, we may need to requote a project if there is new information or a difference in layout from the original takeoff.
Stairs are framed differently from project to project, and most drawings we receive (including CAD drawings) do not show the stair framing. This is why we encourage our customers to submit the entire drawings including stairs.
Tip: Proper measurement and angle ensure no setback
The first step to installing stair posts is to measure the stairs’ nose-to-nose distance and angle to determine the total number of posts beyond the top and bottom. Without the proper stair angle and accompanying drawings, the cable may not follow the angle properly, a significant setback to your project’s completion.
Please note, code rules a 6-inch sphere should not pass through the triangle gap formed between the stair riser, stair tread, and the bottom edge of the bottom rail. Always check with your local building codes before installing.
Tip: Anchor the top and bottom posts first
Once the spot for each post is determined (RailFX recommends maximum post spacing 5-feet on center*, including stairs), mark each post spot on the stair treads. Anchor the top post first, making sure it’s plumb. Leave the lower post and any other flexible for installing cables.
All of our posts are pre-drilled and slotted unless a customer requests a blank post. Our stair posts come with additional length due to the differences in the rise and run, and they may need minor adjustments (cutting a bit off the bottom) as the rise and run will vary per project. Intermediate posts are slotted to accommodate the different angles of stairs and so the cable can pass through without kinking.
Tip: One less cable when transitioning to stairs
Typically, on a level run with 36-inch-high rails and without bottom rail, you will use ten cables. When transitioning to the stairs, you’ll remove a cable (nine cables without the bottom rail) because RailFX stair systems are post-to-post top rail configurations. Conversely, if there is a bottom rail desired, eight cables are required for level runs and seven for the stairs.
In the case of 42-inch-high rails, the level run will use 12 cables without the bottom rail and 10 with a bottom rail. The stairs will be quoted at 36-inches for code compliance and the top three cables will terminate prior as you transition to the stair.
Tip: Determine your handrails
No matter which RailFX cable railing system our customers order, we recommend they order either the RFX100 or the RFX250 for the stair rail. Our adjustable over-the-post hardware, which sits on top of our predrilled intermediate slotted posts, allows the rail to run continuously from top to bottom and articulate to the rake and angle of the stairs.
For example, if a customer selects the RFX300 top rail with a stair section, we will quote the RFX100 elliptical stair rail. If a customer selects RFX200 or RFX400 with a stair section, we will quote the RFX250 square stair rail. However, if a customer prefers to use our 200, 300, or 400 systems, we will accommodate their wishes.
To achieve an ADA graspable handrail option, we can assist our
customers with a RFXADA grab rail to use along with our systems.
In this case, when using our 200, 300, and 400 over the post railings, the RFXADA sub rail will be installed sitting under the preferred over the post top rail. The install is more complicated and features two rails instead of our typical post to post one rail system.
Once all posts are Installed according to your stair rise and run, follow our cable installation instructions to ensure your cables are correctly spaced, tensioned, and finished.
At RailFX, we make it easy for you. Upload your drawings and provide details about your project using our online quoting system, and we’ll contact you with any questions or concerns.
*Always check with your local building code.
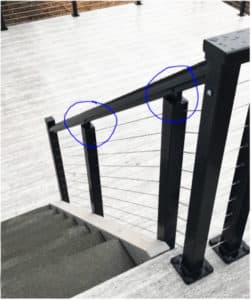
Our over the post stair rail.
Our RFXADA grab rail used with our RailFX400 Top Rail.
